

Introduction to Camouflage
Ah, ye old art of concealment! It’s been an essential part of warfare for millennia. 170+ years in the future, it’s more relevant than ever! In the world of Infinity, the Camouflage game mechanic serves as an abstraction for everything from the lowest tech grease paint and ghillie suit to the most advanced thermoptic adaptive systems.
I’ll go out on a limb and say that Camouflage is also the most powerful and disruptive mechanic in the game. Hopefully, by the end of this article, I’ll have convinced you of that. To start, let’s talk about what the mechanic even does!
What is Camouflage?
Let’s start with the basics. The Camouflage mechanic in Infinity is actually several things: there’s the Camouflage skill which grants the ability to enter the Camouflage state during deployment and during the game. The Camouflage state allows you to represent the trooper as a Camouflage marker on the table. Confused yet?
Yeah. There’s a lot going on here, and we haven’t even talked about the skills that typically accompany the Camouflage skill on a model’s profile like Mimetism, Stealth, and Surprise Attack!

For now, to keep things as simple as possible, let’s just focus on the Camouflage state, which is the interesting one. The only thing you need to remember about the skill is that it lets you be in the state. Got it? Good.
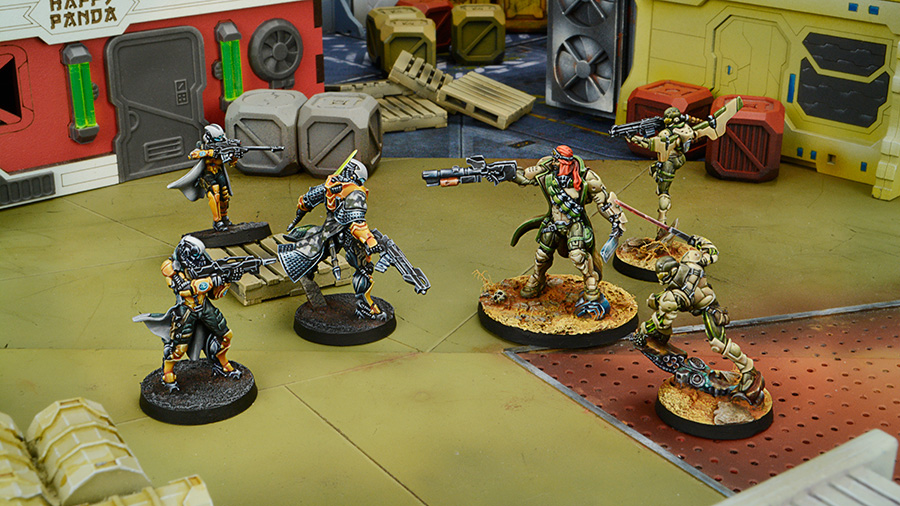
What the Camouflage state means in practice is that the troop is replaced by a Camouflage marker. Instead of being a model on the table, it is represented by a blank token. In the below image you can see an example of a camouflage marker on the left, a normal silhouette marker in the middle, and a standard infantry model on the right.

Part of the reason why the Camouflage state is so complicated is that it introduces a number of exceptions to the base rules, which can be very confusing. If it helps you to develop your mental model, pretty much all of these exceptions arise because troopers in the Camouflage state are represented as markers, not models. A marker functions differently on the table to a model.
Here’s a list of the ways in which a Camouflage marker differs from a model:
- Can’t Touch It – You cannot enter silhouette contact with an enemy camouflage marker — meaning you can’t stab it. And before you tell me that Guard will work…
- Can’t Shoot It – You cannot declare an attack against a camouflage marker, unless otherwise specified (yeah, exceptions to the exceptions!).
- It Sees You! – Camouflage markers have 360 degree Line of Fire, meaning it sees in all directions, so no sneaking up on it!
- It Has Secrets! – Unless the model represented by the marker has been previously revealed, the details of its profile are secret. You get to know:
- The silhouette size of the model, i.e. you know how big it is.
- If it has Mimetism as well as the level (0, -3, or -6).
- Which combat group the marker (or decoy marker) belongs to.
The skill Decoy is separate from Camouflage, but allows you to place a fake Camouflage marker when it deploys in order to confuse opponents. The decoy marker will copy the stats and combat group of the “real” marker.
The AROs you can declare are limited as well! You can only declare:
- Discover: That marker is sus. Discover allows your troop to attempt to reveal the model that the Camouflage marker is hiding. Discover uses the WIP attribute, and is modified by range, Mimetism, cover, etc., (much like a normal BS attack). If successful then the Camouflage marker is replaced by the real model – congratulations!
- Dodge: Get away from me! Dodge allows you to keep your distance from a Camouflage marker.
- Look Out!: It’s behind you! A troop that can see the active model or marker is allowed to declare Look Out. This allows all of your other troops to take a PH-3 roll in order to turn around on the spot. Look Out is therefore best used if one troop can see a threat coming whilst the rest of your models are facing the wrong way – it gives them a chance to turn around.
- Reset: Nuuuu not the 1337 h4xx! If you suspect that an oncoming Camouflage marker is a hacker then you may wish to reset in order to pre-empt a hacking attack. This is also useful if you’re in the Isolated or Immobilized state and your opponent forgets that your model can see their camo token moving around – it lets you take a free Reset, which could result in you successfully cancelling the state.
There’s one more option that you have against Camouflage markers (and many other markers too). You’re not allowed to declare it in most other situations, it’s incredibly useful, and absolutely essential to know. That option is ‘Delay’.
Delay is not a specific skill like Move or BS Attack or Discover. It just means that you choose to delay declaring an ARO against a Camouflage Marker until after they have declared their second skill. After your opponent activates their Camouflage marker and declares their first short skill (assuming whatever that skill is doesn’t cancel the Camouflage state and thereby force them to replace the marker with a model), you can declare that you are delaying. When you do so it enables you to wait to see what the opponent’s second skill is before you declare your actual ARO.
This sounds great, right? Imagine if you could delay against everything? It would be incredible. But there’s a huge catch—if your opponent’s second skill declaration doesn’t cancel the Camouflage state, then you’ve wasted your opportunity to ARO! You lose the ability to declare an ARO. This is potentially a big deal, as it may allow the Camouflage marker to move behind you and cause some serious problems. However, if the Camouflage marker does something to reveal itself (if it declares a BS Attack, for example), then you may fire back, if you opted to delay. So it’s a gamble! I’ll talk more about the strategies and decisions in a moment.
Why is Camouflage (good)?
So why do you want to use Camouflage? There are lots of reasons, because Camouflage offers lots of utility! Let’s break it up into three main reasons:
- Defensive – The Camouflage state can’t be interacted with in the normal ways when defending, so you’re mostly safe from getting shot, at least until your opponent expends some resources.
- Offensive – Camouflage offers you lots of offensive opportunities to improve positioning, dice odds, or outright get unopposed shots due to positioning.
- Utility – It’s just plain useful! Improving your positioning can often let you get to an objective safely, or just bypass a dangerous ARO. The state also lets you play a shell game and hide information from your opponent, at least for a little while.
Let’s break down each of these things down in more detail.
Defensive Camouflage
Okay, first off, Camouflage isn’t an invincibility shield. Your objective defensively is to overload your opponent with bad choices and drain as many orders as you can. To achieve that, let’s talk about what your opponent can do to a model in Camouflage state:
- Discover – If an opponent declares Discover as a short skill or ARO and passes a WIP roll, you are revealed. If they fail, then the declaring model can’t try again until the next turn!
- Intuitive Attack – If equipped with the right weapon, e.g. a Chain Rifle, your opponent can make a WIP roll against you as an attack, which would oppose any action you take like return fire or dodging.
- Collateral Damage – Any template that hits a non-marker trooper (a normal model) that also hits a Camouflage marker will cancel the camouflage state and potentially do damage to the trooper in the Marker state.
Notice how the opponent can’t just shoot or close combat you whilst your troop is a Camouflage marker? That’s why it’s such a potent defensive skill. Camouflage markers can only be targeted if they’re revealed, or hit by a stray template or an Intuitive Attack. They’re very hard to interact with.
So what can you do to limit your opponent’s choices even more? Positioning! Especially when it comes to Intuitive Attacks and collateral templates. Given that your objective is to drain your opponent’s orders, don’t give them order efficiency by putting your Camouflage markers within template range of each other or within range of a non-marker-state model! If you group up your models and markers then your opponent could get a 2-for-1 special if they either Intuitive Attack or land a template!
In this section we’re going to explore a few different scenarios involving Camouflage markers in the reactive turn. The aim here is to discuss different possibilities and help you to understand what your choices are.
Templates
Your opponent might land a template on a non-marker model that also happens to cover your Camouflage marker as well. This happens often with weapons such as Chain Rifles. In most situations this will force a dodge out of you (you’re going to want your troops to get out the way!). However, you may want to sacrifice either the visible model or the camouflaged trooper to take a shot back, especially if you have your own auto-hitting template. The following factors should help you decide what to do:
- Orders Left – If your opponent is low on orders or out of orders, then the risk of continued destruction is lower. In this case it’s probably okay to dodge.
- Position Of Other Enemies – If your opponent has no other troops around then you might consider dodging with your most valued troop and shooting back with the less valued troop. If the lone enemy dies then the threat ends immediately. It might mean the opponent spends a bunch of orders and doesn’t achieve too much.
- Multiple Wounds – If your targeted units have multiple wounds and there’s no chance of taking multiple wounds from the template, i.e. single hit, no continuous damage, not a missile launcher, etc., then you could consider taking the hit on your armor (or BTS).
- High ARM/BTS – If you think you can tank the hit on your defensive stat, you can always gamble! Remember a Camouflage marker is revealed if it is hit. So if you go down the route of trying to ignore the shot due to high ARM or multiple wounds then you might as well shoot back (you weren’t going to dodge anyway, and if you’re hit you’ll be revealed so you lose nothing by shooting).
So in summary, if you take a template hit and you think you can either tank the hit on wounds or armor and have a good chance of killing the attacking model, go ahead and fire back. If you think you can dodge and then figure out a way to get rid of the model on your next turn and your turn is coming up, go for the dodge. If the enemy is on its own with no backup then you could viably dodge or shoot, depending on which troops you need to live, and which are expendable.
Intuitive Attacks
It gets more complicated if your opponent did an Intuitive Attack. Remember an Intuitive Attack is a special kind of attack that some Direct Template weapons can declare against markers. An Intuitive Attack puts the opponent’s WIP roll against your PH roll for a dodge or BS roll for a shot. In that case, you might want to fire back if you think you have better odds, like if you have a shotgun or a good BS stat.
You should probably oppose the roll in most cases, but you might want to consider doing nothing if your opponent’s WIP is poor. Lots to think about here, but remember you’re just trying to drain the opponent’s orders and hopefully keep your models alive. Pick whatever is the most efficient way to achieve that goal.
It might be to kill the attacking model to stop further damage, or it might be to just force that model to fire chain rifles at models with high PH while they dodge. One thing to note is that you can’t get into silhouette contact with a Camouflage marker, so anyone wanting to CC attack you will have to discover you first.
Discover
Discover is a different beast entirely. All it requires is LoF, whereas most template attacks require the attacking model to be close (though there are exceptions like grenades, rockets, missile launchers, and the dreaded plasma weapons). You generally want to avoid positioning things that would allow a circular template to cover multiple models, so hopefully you won’t be in that position! But Discover, on the other hand, has a much higher effective range.
If your opponent is declaring Discover in their active turn, that usually means that you intentionally left a camo marker out for them to see or they’ve maneuvered in such a way that they can see something. In both cases, this probably means that you’re draining orders properly. Either they had to move to get something in view (which takes orders), or you left something out to encourage them to Discover (which, again, takes orders). Discover is also no longer a valid skill to declare during an Impetuous order, so warbands won’t get “free” Discovers anymore on their first order. Essentially, discovering camouflaged units can be order intensive and therefore we want to use this to our advantage.
Generally, you won’t plan on having a model move into view and then Discover you – it’s hard to set that up and to encourage your opponent to do so. I’m talking about your opponent marching a model all the way into the midfield and then walking around a corner to Discover, not poking into a firelane to see a marker you have standing on a roof or something. If your opponent spends a lot of movement, that’s generally good for you–they’re only advancing one thing (or a fireteam, which creates more attack avenues for you) and they’re choosing to stop and deal with something. Hopefully the exchange works out for you, but this again is just a case of “how do I make things more annoying?”
Let’s look at the other example. You have a marker watching a firelane, which you intentionally put there. There are a couple of cases, depending on what your opponent does:
- Second Skill Move – Your opponent has declared two movement skills and on the second movement is now in view of your marker.
- First Skill Move – Your opponent has declared their first movement skill, and is now in view of your marker.
- First Skill Discover – Your opponent is already in view, and is declaring “Discover” as their first skill, most likely following it up with attack.
Depending on what is under the marker and your intent for it, I’m generally of the opinion that you should force your opponent to perform a successful Discover in most cases, instead of revealing. Generally, your opponent will be WIP 13 or so, and with cover, that puts them at 50% chance of succeeding on the roll (assuming they take -3 for cover, and have no range bonus). If you also have Mimetism (and most things with Camouflage do) that further decreases those odds, especially for Mimetism -6. If your opponent fails the Discover, they cannot try again with that model that turn, which is amazing for you. They can still try with another model, but now you’re forcing them to bring another model into position to try again, which means you’re draining orders and being annoying, which is exactly what you should be doing. If your opponent gets impatient after failing a Discover roll and moves a model into the open (intending to ignore your camouflage marker and just walk past it), you might want to consider revealing and taking a shot against them while they’re in the open, but this depends on how tough and lethal your camouflaged unit is.
Let’s go through the options all together:
- Second Skill Move – This is bait. Whatever your opponent threw out in front of you is likely either A) going to survive what you do to it or B) a sacrificial lamb. They are trying to get you to break your Camo state and are willing to risk something for you to do so. Look around the table. Is there anything else on the table that can threaten your marker? Perhaps another marker on their side of the table or appropriately ranged weapon a short skill move away from being in LoF of your marker? Unless your model is durable and you expect it to survive a few orders of concerted effort to kill it, I’d say keeping marker state is better.
- First Skill Move – Force the Discover. They’re trying to get some order efficiency here by encouraging you to reveal. This is especially the case if the thing they revealed is likely to kill you, like an HMG or equivalent. There is a slight risk here, especially if a second move will allow them to cross a narrow firelane and get to safety, but in general, you want to drain their orders. Best case scenario, they fail the Discover and they have to try again with a different model, which may ruin everything. Worst case scenario, they Discover successfully, and now you can shoot back on their next order.
- First Skill Discover – This is the tough one. It really depends on what the specific matchup is. If you think they have a low chance of success at the Discover, you may want to take the chance that they fail and therefore declare nothing. If they have a high chance of success or you have a good chance of succeeding in your ARO, you may want to reveal! It also depends on what is under your marker. If it’s a throwaway unit, like a Daylami, you may want to let them have the free shot if they succeed, it’s not a big deal if you lose it, and they’re still wasting orders.
Regarding the last scenario, there is a Discover+Attack option. The intent is to allow you to declare a Discover and then a BS Attack on the model hidden by Camouflage. This is to allow you to declare an attack that would otherwise be illegal. If the Discover is successful or the model reveals itself, the attack is resolved. If the Discover fails, then the attack is canceled. Note that the Attack need not be declared against the target of the Discover, and that you can also split burst to include both the Discover target and other targets. This sequence is so tricky for the player controlling the camouflaged unit because there are few good choices. If you reveal to take the ARO then you might just die to incoming fire. If you do nothing then you might receive unopposed shots, should the Discover succeed. Following the tips above is the best thing to do – if the opponent’s WIP is low then consider doing nothing. If the opponent’s weapon isn’t very deadly and you could win the face-to-face roll then consider revealing.
So, in summary, defensively you just want to drain as many orders as possible and make things difficult. That’s what you should be optimizing for. Just remember that killing something also drains orders on subsequent turns. If you want some easy rules to follow, always forcing the discover is generally a good rule to follow, and as you develop in your playstyle you can add exceptions as you see fit.
Offensive Camouflage
Now for the fun stuff. Offensively, Camouflage is very powerful. When it’s your active turn and you’re activating a Camouflage marker, there are very few options available to your opponents in terms of legal AROs:
- Discover – They can try to break your Camouflage.
- Dodge – They can hide from you, get free movement, or try to move into a more annoying spot.
- Look Out! – You can have other troopers declare dodge in place AROs, so they can turn to face the threat.
- Reset – Generally this would be used to get out of some sort of status effect for free (e.g. Immobilization / Isolation).
You can also Delay against a Camouflage marker. This is a double-edged sword, because whilst it allows you to wait until the Camouflage marker declares its second short skill before you ARO, it can also result in you losing your chance to ARO at all. If you’re reasonably certain that the marker is going to reveal itself and attack you, declaring that you will Delay is a good idea, as it will let you have complete information. You’ll know the trooper as well as the weapon or equipment they’re using to attack your model, and then be able to respond most appropriately.

However, if the model does not reveal itself on its second short skill, e.g. it continues moving, you will have forfeited your opportunity to do anything. If only one model is capable of seeing the marker, this choice can often be difficult! If multiple models can draw LoF, then having some models declare discover while the others Delay is generally a good plan.
You can “telegraph” an attack by pushing your Camo marker into view and in cover. Hopefully your opponent will delay thinking that you are about to attack them, and then you can move to safety. And herein lies the real power of Camouflage in the active turn: there is almost nothing your opponent can do that will deny you the ability to move your full movement safely. They may successfully discover you, but you will only be visible for the next order, so you are entirely safe for the first one.
For example, you move with a camouflage marker – opponent discovers – you move again – the discover roll passes at the end of the order and your troop is revealed but you’ve already moved 8”. This is one of the reasons the Camouflage state is so useful. You can recklessly move camouflaged troops across firelanes and even if they are revealed it might not matter – you’ve got them to where they need to be anyway.
As always, there is an important exception: mines. If a mine catches a Camouflage marker in its trigger area, it will go off and potentially kill a marker! To prevent shenanigans, you can only place a mine that would affect a Camouflage marker if you succeed at an Intuitive Attack, but that only matters at time of placement. You can avoid this restriction if there are other legal targets for the mine at time of placement, so this is yet another reason to be careful of putting visible troopers in template range of your markers!
In your active turn, all this means is that you should give all suspicious enemy Camouflage markers a greater than 8″ berth, to avoid getting hit by a mine. Unless you’re very very sure that it’s not a mine.
Leveraging Movement
Offensive Camouflage is all about leveraging the ability to move without being attacked, for at least your whole movement. The ideal scenarios are either you:
- Move in front of a single trooper who discovers you, at which point you can just shoot them, unopposed, with a normal roll.
- Move in front of multiple troopers, who all delay, at which point you can just keep moving with impunity.

If a single trooper delays against you, as a trooper with the Camouflage skill you likely also have access to the Surprise Attack and Mimetism skills. Depending on the rating of those skills, e.g. -3 or -6, with cover and range modifiers you could even apply a -12 penalty to your opponent’s reaction if you reveal. If your intent is to open fire with the model, opposing a single trooper in a face to face roll is probably fine.
The issue is when you have multiple troopers in sight and the declarations are mixed. The most common case is a disposable trooper like a messenger remote, aka a flash pulse bot, declares discover while the more powerful trooper (usually with a real gun) delays. In this case the decision is more complex. If your intent is to attack the delaying trooper, then it’s business as usual. Start blasting! If you’re trying to move somewhere, then do that.
Basically, if you’re exposing your model to some number of your opponent’s models, then be prepared to take multiple AROs and have a plan for the various possible combinations of delay and discover. You only really have one full movement of “invincibility” so if you’re trying to get somewhere, so don’t try to cross a 12” gap or something. If your opponent makes what I would consider a mistake and doesn’t discover with something, then you can get multiple moves safely.
So, why move?
- Attack – By moving, you can possibly get your target out of cover or be behind them entirely and deny them the ability to shoot back. This is incredibly powerful. A camouflage marker that’s allowed to move without being discovered could be shooting you in the back in a few orders!
- Defense – This is more of a rare case for Camouflage. You generally don’t want to grant a discover if you’re just trying to move back into a safe spot, but sometimes you’ve over-extended something important (like a Camouflage Lieutenant) and you’re willing to spend a few extra orders entering the camo state, walking away, and then re-entering Camouflage if you got discovered.
- Objectives – Infinity is generally a game of interacting with objectives, which you have to get to. The most efficient way to get there is to just spend all of your short skills on movement, and Camouflage lets you do that safely.
In summary, for the Offensive uses for Camouflage, you’re basically trying to leverage your ability to move and or stack negative modifiers against your opponent. You have a lot of capabilities, but be very careful as Dodge is now significantly more powerful in N4 than it was in N3.
If you grant a Dodge ARO to an enemy trooper, they can move into a very inopportune place for you! As an example, you may want to plant a mine near an enemy and then come around the corner to force bad decisions on them. However, now they can dodge into line of fire of you as an ARO to the mine placement, which ruins all your plans.
Utility Camouflage
We’ve already talked about how to use Camouflage to gain the ability to more or less move freely through contested areas. This will let you shift models into various areas in an area control mission, get models to objectives, etc. So, as a quick summary:
- Movement – As we described earlier, you can move about the table with some freedom of movement to get better positioning to attack or to get an objective.
- Obfuscation – If you haven’t previously revealed your trooper under the marker, your opponent doesn’t know what it is. That lets you surprise them with some gear or tricks, or just force them to over-invest in putting points into an area to control as they don’t know how many points you’ve moved in.
There are also a number of things you can do like include a camo token in a coordinated order, which may force your opponent to declare AROs against visible models as opposed to a camo token.
From the perspective of utility, getting you to an objective safely is the primary benefit here, and we’ve talked about how best to approach that already. Note that you can also re-enter the Camouflage state as a coordinated order, which may help you protect your own troops before the end of your turn.
Other utility aspects of camouflage might include:
- Using the Camouflage state to get close to a fireteam before deploying a mine
- Using the Camouflage state to cross a firelane before deploying a repeater
- Crossing a dangerous hacking area safely
- Baiting opponents into discovering your camouflage (e.g. by moving into the open as though you’re charging straight at an enemy), and then declaring unopposed Forward Observer attacks in order to target an enemy.
- Using the Camouflage state’s 360 degree Line of Fire in order to protect your deployment zone from nasty troops with Combat Jump.
How to (deal with) Camouflage?
I think the above discussion should prepare you to deal with a handful of Camouflage troopers, but what if you’re standing across the table from a vanilla Ariadna player? Ariadna players can, without expending any real mental effort, take an all Camouflage list that will be quite effective on the table. There are certainly other factions that can do similar things, but the same ideas apply.
So, if you’re faced with Camouflage spam, what do you do?
- Play the Objective – First off, remember that the goals for defensive use of Camouflage were to drain as many orders from your opponents as possible! Don’t fall into the trap! If the mission isn’t a mission focused on killing, just work on the objectives.
- Use Your Camouflage – If your opponent drops their camouflage to Discover you on your turn, hey, that’s great! You can get to the objectives, do your business, and get out.
- Ignore the Camo – Your objective is to get the job done. If you have to shoot your way through Camouflage troopers as they reveal themselves, so be it. The danger here is camo troopers with missile launchers and the like catching your link team in an explosion, or catching you out cover, etc. Heavily armored or multiwound troops not in a link team are excellent for this job.
- Use Sensor
- Discover Bonus – Sensor gives you a +6 bonus to your discover roll against Camouflage markers. This is a passive benefit, and works for free whenever you declare the Discover skill. Make sure you’re aware of what models your opponent has with sensor when you’re moving your models too!
- Sensor Skill – The skill allows you to make a roll at WIP +6, which will reveal all Camouflage troopers (and hidden deployment troopers) in your Zone of Control. Typically you could only reveal troopers in your Line of Fire and only one at a time with Discover, but Sensor allows you to reveal multiple models from out of Line of Fire! This can help offset the order drain of having to move to LoF and Discover one model at a time.
- Deny Recamouflage – If an enemy is in ZoC of a model with Sensor, they cannot regain the Camoflage state. This reduces the utility of your opponent’s camouflage, even if all it does is force them to move away from you before re-entering camouflage.
- Use Templates
- Auto-hits – For the most part camouflaged troops are very squishy. They usually have one wound and no armour. This weakness is often offset by the Mimetism skill, which makes the troop harder to hit. You can bypass the advantage of the Mimetism skill entirely by deploying troops with template weapons that auto-hit.
- Intuitive Attacks – We have spoken a lot about how camouflaged troops cannot be attacked. Intuitive Attack is one of the most important exceptions to this. Any weapon with the Intuitive Attack label can be used against a Camouflage marker. You can use this to put your opponent’s camouflaged troops into difficult situations.
- Consider Playing Second
- Camouflage Reveals – Troops in the Camouflaged state conceal their true identity. Their attributes, weapons, and skills are a mystery to you. However camouflaged troops lose the Camouflage state if they shoot or interact with an objective. Therefore it can sometimes be a good idea to play second against a camouflage heavy list so that your opponent is forced to reveal their troops if they want to interact with you or score objectives. In doing so the opponent will show their hand, and you might not have to waste time declaring Discover in your own turn. Be careful with this though, because if you’re not precise in your deployment then you could take a lot of casualties.
- Flip The Order Tax – If you take an aggressive role against a camouflaged troop then you need to pay an order tax in the form of Discovering them first. However if a camouflaged troop wants to become aggressive against an opponent then they need to pay an order tax to re-enter the Camouflage state. By taking a more passive role against camouflaged troops you flip the order tax from being your problem to your opponent’s problem (because you don’t need to Discover, but they might need to re-camouflage).
- Stack AROs
- Easy ARO declaration – Declaring AROs against camouflaged troops is hard because of the tension between Delay and Discover. You want to Delay so that you get to shoot if they reveal, but you want to Discover to stop them walking past you freely. If you stack two or more ARO pieces together then you make your life easier because one can Delay and the other can Discover.
Expendable Troops – Consider which expendable troops you have in your list that can declare Discover as an ARO, instead of Delay. The servant remotes that follow Doctors and Engineers are perfect for this.
You’ll find your own balance of how to deal with Camouflage, and you’ll start to be able to read your regular opponents to see if they’re bluffing you with a Decoy camouflage marker. Orders are the main resource of the game, and Camouflage drains them. Play carefully, only invest as much as you need to, and if you can ignore the threats your opponent presents and still achieve your aims, do so!
Closing Thoughts
At the beginning of this article, I wrote that Camouflage was the strongest mechanic in the game. Hopefully I’ve convinced you, but if I haven’t, let me take a step away from Infinity and into interactions in gaming in general.
Camouflage as a mechanic introduces non-interactivity into the game, which for a game like Infinity, where “it’s always your turn,” is quite disruptive. Normally, my defense against your troopers that are moving up the table to attack me is to shoot at you, but when Camouflage markers come into play I can’t do that anymore. I’m now faced with a choice of waiting for you to do something, or letting you shoot at me for free, which is somewhat of a non-choice for me, as both are bad.
So now, my way of interacting with your model isn’t there anymore, and you’re more or less free to move about and do what you like. In my active turn, you can just sit there and not declare any AROs as I move around in front of your camouflage markers. You force me to spend my resources to interact with you by discovering or sensoring you first, which are rolls that I can fail. I think we’ve all had a game or two where you’ve thrown 2-3 maybe even 4-5 discovers at a marker, all of which have failed.
In other words, Camouflage breaks all the normal game mechanics of Infinity and forces your opponent into bad decisions (which cost resources) to interact with you. This is similar to having hexproof or protection from in Magic the Gathering, or being out of range in other games, etc.–basically anything that renders your agency impotent.
In Infinity, you can regain agency, but it costs orders and mental reserves. You have to have the right tools in the list to help you, the orders to get the tools to the right place to declare the right skills, and the presence of mind to be able to execute your plan on the table. Don’t let your opponent lead you around by the nose with their camouflage, just play to your objectives and get the job done. If you have some Sensor on the table, that wouldn’t hurt either!

Pingback: Infinity The Academy – Intermediate: Camouflage – Under Bourak's Sun
Great article. Well written and laid out with some good thoughts. One item to add might be that you can also keep a model from re-camouflaging by having LoF to the model with any of your troops. Since it’s a full order to re-enter the state they would then need to spend one (or more) orders getting out of LoF and then another to enter Camo state again.
Thanks for the good article, much appreciated!
Pingback: List Building for a Mission – Infinity the Academy
Pingback: Infinity The Academy – Intermediate: List building for a mission – Under Bourak's Sun
Thank you for breaking down the rules for ease of understanding.. Most English speaking players don’t understand how difficult it is to translate from Spanish to English.. even with the Wiki, some things are left to the imagination or interpretation.
The one thing I still have a hard time wrapping my head around is.. What’s a Pitcher..?
I know, wrong article.. but still..
Thanks again..
Jason
Pingback: Infinity The Academy – Advanced: Impersonators – Under Bourak's Sun
Pingback: Impersonation – Infinity the Academy